Add a page

Lesson time: 20 minutes

Lesson objectives:

In this lesson you will create a page and add components using the Add Content feature on the Web CMS Dashboard as well as edit an existing page.

Introduction

The Page content type is used to create  various nodes on Web CMS. It uses widgets to display all content types except Events and Articles.
Add a page

  1. Log on to the Web CMS Dashboard and ensure that the site you select is the Current site.
  2. Click the Content tab > Add content dropdown menu > Add Page.
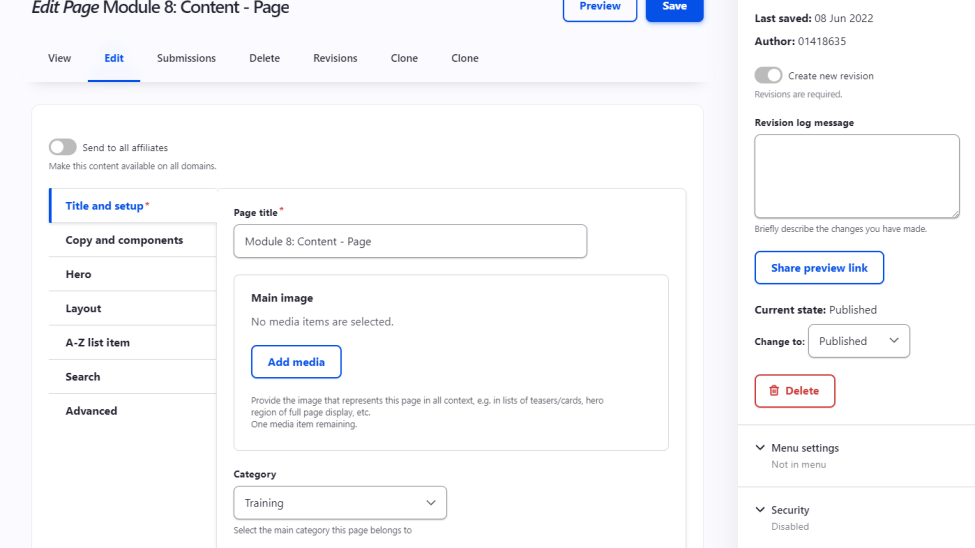
    • Enter the following information in the Title and setup tab:
      • Page title: this title appears in front of the main image at the top of the page. It is also used for metadata, URL structure and Web CMS listings.
      • Main image: appears at the top of the page.
        • Click Add media
          • Either click Choose File to upload an image from your computer,
            OR
          • Search the image library, and sort or filter results by image type, tags, subsite.
          • Select the applicable image.
        • Select the applicable Category from the dropdown list that the page belongs to. This option classifies your content as well as groups it for the A-Z lists.
        • Tags: these keywords, separated by a comma, are used to describe and improve findability of your content. They are also taxonomy reference fields to group content from different categories. Multi-word phrases can be enclosed in inverted commas for precision (g., “teaching and learning”).
      • Complete the following actions in the left side panel:Click Copy and components.
        • Summary: A short blurb (240 characters max) appears below the page title but in front of the main image at the top of the page.
        • Body: This is the page’s main content, which is displayed in a WYSIWYG editor, that allows for basic formatting, styling and media embedding.
        • Aside: Can be used to display content to the left or right of the body , depending on the selected layout option.
        • Components: different page builder elements can be addedas individual rows to further enhance  the page’s formatting. The following elements, which will be discussed in more detail later, can be added as individual rows:
          • WYSIWYG editor
          • Album
          • Notice board
          • A – Z list
          • Calendar
          • Feedback form
          • Contact group
          • Vacancies
          • Webform
          • Upcoming events
          • Audio
          • UCT multi content reference
          • UCT micro view
        • Click Hero: enabling this feature overrides the default breadcrumb settings allowing for manual updates to the breadcrumb trail.
      • Click Layout.
        • Enable Navigation aside: activates the page’s side menu.
        • Availablelayouts:
          • Default
          • 2 Column – Aside left
          • 2 Column – Aside right
          • 3 Column
          • Full width
        • Click A-Z list item.
          • A-Z item: enable this feature to register the page as an A-Z list item.
          • Link option: select your preferred way of opening the page from the A-Z list.
          • Alternative URL: if the page is a place holder for something, provide a redirect URL .
        • Click Search.
          • Enter additional keywords for more relevant, granular and improved search results for this article.
        • Click Advanced.
          • If a script has been developed for something, select it from   athe library dropdown list.
  3. Complete the following actions in the right side panel.
    • Create new revision:
    • Revision log message: log recent content updates.
    • Share preview link: share link with an individual who is not an authenticated Web CMS user but needs to review content.
    • Current state: existing content state.
    • Change to: change the content state to draft, published or unpublished.
    • Delete: remove content.
    • Menu settings: enable this feature to add a page directly to a menu item.
    • Security: allows the page to be password protected. Any user attempting to access this page is promptedto enter a password before viewing this content, unless the user role has permission to bypassauthentication.
    • Meta tags: added by default and should be sufficient for most pages. These can, however, be customised per node and overwrite default settings. All provided tags are used as this content’s descriptors by various search engines, social media platforms and content sharing services that it was shared to.
    • Access groups: if specific groups within UCT need to access this page, they would thave to authenticate to view its content (e.g., Staff orStudent login).
    • Node lock: enable this feature to prevent those in lower rules from editing or updating content.
    • Archive: enable this feature to hide this page from other content’s Related news or Similar content.
    • URL alias: automatically generated but can be replaced with the current node’s title oin the Domain-specific path
    • Authoring information: automatically populated with the authenticated author’s staff number, and authoring date and time.
    • Promotion options
      • Promoted to front page: This is not currently in use, but is a default Drupal feature.
      • Sticky at top of lists: places this content at the top of lists or wherever it appears, when enabled. This order takes precedence over other sorting options such as alphabet or date.
    • UCT sitemap: adds this node to the sitemap navigation, when enabled.

Multi Content | Grid | Banner

Multi Content | Grid | Card

Screenshot of the CMS dashboard

Module 8: Content - Page

In this lesson you will create a page and add components using the Add Content feature on the Web CMS Dashboard as well as edit an existing page.
Read more

Multi Content | Grid | Teaser

Multi Content | Carousel